|
 |
July 27, 2026
Information
Throttle Body / Intake Plenum Cleaning Procedure
Last Updated: October 28, 2005
My original idea for cleaning my plenum came from cleaning my throttle body. While spraying cleaner into it, I noticed a lot of black gunk coming out of the plenum that never seemed to end. I eventually got around to getting a plenum gasket and got to work.
Disclaimer - I will not be held responsible if you screw up your car in any way by doing this. If you need my help, feel free to email me.
Tools / Parts
- Can of throttle body cleaner
- A nice brand of degreaser (I used Greased Lightning)
- A plenum gasket set (you may also need a throttle body and EGR gasket while you're at it)
- A garden hose
- A towel
- A small wire brush or toothbrush (the stuff isn't just going to all fall off)
- Pliers
- A metric socket set (you'll need a 10 and 13mm socket w/ extensions, and probably some other tools)
- If you're replacing the EGR and TB gaskets, you may need a razor blade or scraper
Procedure
Step 1 - Disconnect negative battery cable
(I didn't do it since I'm lazy, and I didn't get electrocuted, but you aren't dealing with electrical stuff so it doesn't matter, I just wanted to get it off my chest so if you get electrocuted it's your fault, not mine.)
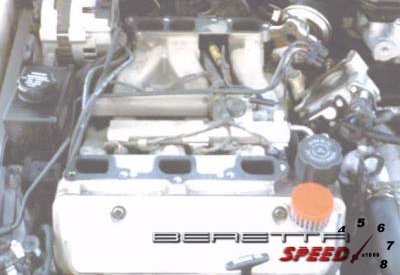
Step 2 - Remove the Throttle Body
1. Remove whatever intake setup you have all the way to the throttle body
2. Disconnect the vacuum lines to the TB
3. Using the 13mm socket, remove the 2 bolts holding the TB onto the plenum
Once you have that loose, you're done with the throttle body. Don't worry about the cables, they wont get in the way.
Step 3 - Remove the EGR valve
I have done this on a 2.8 with a vacuum controlled EGR and a 3.1 with a Digital EGR. They are both easy to remove. The older one has 3 bolts holding it onto the plenum. Remove those and it should be free. For the digital EGR, you have 1 bolt and 2 Nuts. Remove the bolt first, then the nuts. I used a wrench to get the one in the corner loose. Once you loosen them a little, you can turn them with your fingers. You may need to pry it off the plenum with a screwdriver if the gasket is bad.
Step 4 - Disconnect the brake booster vacuum and rear supports
This is a little more complex. The brake booster vacuum is a hose that clamps on to a metal hose. Using pliers, move the clamp out of the way and pull the hose off. The next step is to remove the nuts on the back of the plenum. I don't really remember how many there were, just remove the ones that attach to it. There should only be a few. The metal pipe coming out of the plenum can stay - it's not a problem.
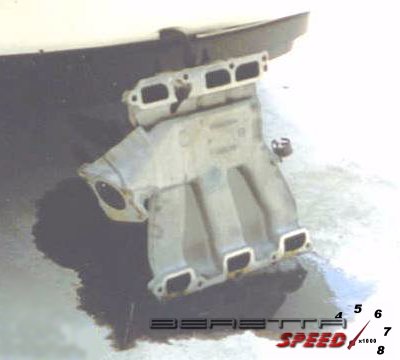
Step 5 - Removing the plenum bolts and the plenum
There are a total of 9 bolts holding the plenum onto the lower intake manifold (IM). Remove these with a 10MM socket. On my 2.8 there wasn't a problem, but on the 3.1, there were rubber boots that went around the bolts. It's strange, just don't break them. Remove the bolt and then the boots. Once you have them all out, you can remove the plenum. On the 3.1's you have to remove the PCV valve under the plenum. Use some pliers and remove it just like you did the brake booster vacuum. Once that is done, remove the plenum.
Step 6 - Cleaning
This is the fun part. When I first did mine, I wasted a whole can of TB cleaner, just to remove a little of the dirt. I then switched to degreaser and a garden hose, which was far more effective. Just spray it in, let it sit for a second, and blast it out with the hose. It will take a while, but make sure you get it all out. I sat mine up so I had 3 ports on top and 3 on the bottom, so the stuff would flow out the bottom. Alternate around to make sure you get it nice and clean. Also spray from the side where the TB and EGR attach. There was some carbon buildup where the EGR was, I scraped that out with a screwdriver. Use your old toothbrush or wire brush the scrub the ports where the black stuff won't come off, you can also use your finger to get where the toothbrush can't go.
Once you get done cleaning it to your satisfaction, dry it off (make sure the inside is good and dry). If you'd like, spray some TB cleaner into the lower manifold ports, but
don't use too much as it has nowhere to go but down. Replace the old gasket with the new one, put it all back together, and fire it up. It may have trouble starting, but give it some gas and run it for a bit until all the cleaner gets burnt up.
Note: Make sure the gaskets are identical!!! The gasket on the 3.1L was slightly different (it had a raised border where the ports were and we had no vacuum - we had to take it all apart and reuse the old gasket). You may or may not have to use a new gasket, it's your call. If you start it up and it runs like crap and doesn't improve, the brakes barely work, or you have an SES light, you have a vacuum leak. Check your vacuum hoses. If they are fine, the gasket is most likely not aligned correctly or is the wrong one.
And that about it! Take it for a drive and see if you notice a difference. I noticed a 5-10HP increase in my mid RPM range, just by cleaning this thing! And, no, don't bother removing the lower IM - you'll have to remove the lifters and pushrods and stuff to get to it.
contributed by: Anonymous Contributor
5546 views
|
|
|
 |
|